Posts

Showing posts with the label organizing

HOw To OUR JULIA CHILD PEGBOARD WALL

Image
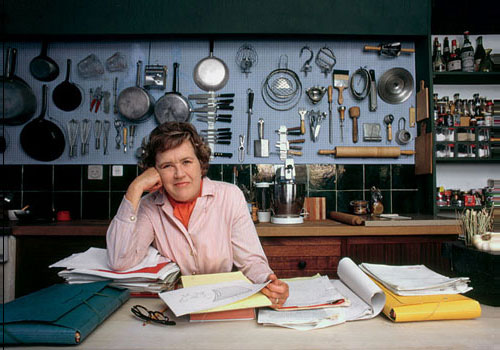
We call it the "Julia Wall". In fact, we have since we bought the farmhouse.  It was this big, blank wall as you walk into the kitchen from the living room.  It was too shallow for a piece of furniture, which would stick out into the path of the doorway.  Shelves would also have to be very shallow and thus not very practical.  The obvious use would be pictures but in a small house, where space is valuable, that just seemed frivolous.  But once the house was painted on the inside and we saw the empty, white kitchen for the first time, we just KNEW we had to have our very own Julia Child inspired wall.   2nd Man and I were huge fans of the late, great, Julia Child .  We've both read her biography and both watched her on television for years while growing up and then into adulthood.  She inspired both of us to cook, create and enjoy time in the kitchen.  And one thing we always noticed in the background of all of her kitchens was her ...

HOw To TYPESETTER TRAY FUTURE PROJECT

Image
Vintage typesetter tray One of our dear friends asked me if I wanted this the other night when we all met for dinner.  She thought we could do something neat with it at the farm. Of course I said yes! These things are cool! For now I'll put it aside as a project for later when there is more time to just relax inside but my mind is wondering about the possibilities. Should I paint it? Leave it as is? Wallpaper the back side? Put glass over the front? Hang it on a wall? Lay it on a table? And then what to put in it?  I've seen shells, rocks, leaves, photos, trinkets, mementos, etc.  I am going to create a crafting space at the farm, and this could also be valuable to hold beads and thread and things like that. Decisions decisions.  Anyone seen any cool ones?

HOw To WALL SHELVES UP ABOVE UTILITY SINK

Image
  Got the new shelves up above the utility sink. Forgive the photos, using a backup camera today and I don't like the quality of the photos it takes.  It is what it is, ha. Ikea Gorm shelf hack into wall shelves Well, on a slow and rainy afternoon, I got the shelves up above the utility sink in the mudroom!  I had to think outside the box to come up with something.  I saw these galvanized metal shelf brackets at the local hardware store.  I liked the metal because it looked like the stainless steel of the sink.  But then I needed to find some shelves to put on them.  The obvious choice would just be a regular "shelf" like you find in white, black, wood grain, etc.   Galvanized metal shelf bracket, closeup  Then I remembered Ikea, where we got our Gorm shelving. CLICK HERE to see the posting when we got the shelving units.  They made 'extra' shelves for them in a smaller size.  I wondered if they would work? ...

HOw To GLASS JARS IN THE PANTRY

Image
Jars on pantry shelves One of our favorite storage methods, and one that has been tried and true for a long time, is glass jars.  They sell these "cracker jars" as they are called, at most of the big box stores.  I've also seen them called "biscuit jars".  A couple of weeks ago, I decided that every time I went to either Target or Walmart, I would pick one up with whatever else I purchased.  They are very affordable, usually less than $5.  These particular jars, made by Anchor Hocking, come in three sizes, small, medium and large.  You can find them in smaller sizes as well either online or at other stores. We use them to store everything in the pantry, flours, sugars, rice, and everything else 2nd Man uses to cook with.  We even have a couple with handles on them that we store cereal in.  Yep, we pour the cereal out of the box and into the jar.  It lasts twice as long in glass. Glass has always been our "go to" storage method.  No p...

HOw To UNDER CABINET JAR MOUNTING

Image
Magnetic Jar Rack Ran across this terrific idea on the Internet the other day.  Someone took a magnetic strip and mounted it under their kitchen cabinet.  Then they took metal top jars and hung them, magnetically, from underneath the cabinets.   We have those two new white upper cabinets in the kitchen, this might just be a great thing for them.  I like the way it is mounted further back so that they don't cause you to lose counter space below. Awesome idea that I thought I'd share. If/when we do it, I'll be sure and post details of what we found and how it came out.

HOw To MORE JARS FOR THE MUDROOM

Image
Montana Jars at Target I saw these jars today at  TARGET  and we think they will be perfect for our larger bulk ingredients.  These are called "Montana Jars" (I love the names of some of these things), and are made by Anchor Hocking.  I need to do some online research and make sure I can't find them cheaper elsewhere, but they look like a pretty good deal.  I'll get several of them, maybe just the large size.  It's holds 2 1/2 gallons and would be perfect for the bulk ingredients like all purpose flour, bread flour, sugar, etc.  I'll let 2nd Man decide what he needs to put in them.  Believe it or not, the ones we have for the few bulk ingredients at home now are bigger than these! Anyway, I'm off to get some of these this evening on the way home.  I love this part of having things done inside...the decorating & planning, phase.

HOw To NEW SHELVES IN THE KITCHEN

Image
Kitchen wall shelves Here is something I did for 2nd Man as a surprise.  We had this big empty spot on the wall behind the stove.  Storage and a place to put stuff is always important in a smaller house and so we did not need a big empty wall with nothing useful on it.  Sort of like the JULIA WALL we recently did. So one day at lunch, I found these really neat cast iron shelf brackets that looked sufficiently retro/vintage.  Then I went to a local hardware store and bought a couple of prefab white shelves.  They are both 3 feet long.  I got two sizes, the top one is 12" deep and the bottom one is 8" deep so that it doesn't interfere with working on the marble top table next to the stove. He saw it this weekend and of course loved it.  Now he has a blank slate to fill up as he desires.  Cooking oils, herbs and spices, maybe some mixing bowls? I'll have to make sure that I at least have some input, ha. After the UTILITY SINK SHELVES ...

HOw To SINK SHELF

Image
Shelf for mudroom sink Remember a few weeks ago when I put up the shelves above the mudroom sink?  Click HERE for that posting.  Anyway, I bought a set of 4 shelves from Ikea but only used three of them above it.  I was trying to think of what to do with the extra one when I temporarily laid it across the sink. Turns out it fits nicely and gives a sort of extra horizontal space to sit things on,  for example, a basket to strain and rinse veggies in.  Even with the faucet running, the stream of water runs out passed the shelf when it's pushed to the back.  I am thinking about actually getting another one so I can just make the top an extra table surface for the mudroom when needed.  They can easily store at the side of or underneath the sink.  A coating of some water proof deck type stain might be good as well, just so no worries with being wet. I love it when something unexpected comes out of something else.

HOw To NON SLIP DRAWER LINERS

Image
Drawers are lined It's the little things...I was also able to get all four drawers in the kitchen lined with the rubber non stick stuff like we have in the city house now.  In the city, we use a beige, since i figured this was going in the bright white freshly painted kitchen, I'd get white. White Non Slip Drawer Liner We love this stuff.  It's great for the bottom of your drawers (and shelves) because it keeps things from sliding around.  It also keeps utensils and such from scratching the paint in the bottoms of the drawers and acts as a bit of a cushion as well. Best of all, it's removable...it doesn't even stick, it just stays down by itself and doesn't move around.  You can find it just about anywhere, hardware stores, Walmart, Target, etc. So, we got this done in all the drawers.  Now we can start putting stuff in the drawers as we get it.

HOw To ORCHARD RACK BUILT AND IN PLACE

Image
This is the orchard rack that I blogged about HERE .  As you can see, it's all in pieces in a box.  It looked fairly intimidating when I first opened it until I realized it was already mostly assembled.  It went together very easily...it's just a matter of installing the sides via cross bars across the top and bottom, and then front and back.  After that, you just slide the drawers in place.  It couldn't have been easier.  I'm considering adding wheels to the bottom to make it easier to moved around, especially when it's full, so that might be a later modification. And here it is in it's new home.  We were originally going to have it next to the other shelving.  But because it's the same type/color wood as the shelves, it looked strange, almost like an unfinished set of shorter shelves.  So we traded places with it and the water cooler and we think it looks much better this way. Here it is with ...

HOw To MORE GLASS JARS FROM THE PANTRY

Image
Cracker Jars for Pantry Storage 2nd Man was refilling some of his pantry jars today and I said "whoa, wait, let me take some pictures!".  I'm not sure he still understands this whole blogging thing, but whatever, I took the pictures anyway. As you can see these are the jars we use most often for storing dry ingredients in the pantry.  In this photo, we have two of the large ones, with jasmine rice and brown sugar, a medium one with oatmeal, and a small one with corn starch.  I used one of these Dymo Label Makers with the clear label tape cartridge... Dymo Letra Label Maker ...to make the labels on the jars.  It's quick and easy and easy to replace if we change out a jar for something else, and gives them all a unified look.  These label makers are awesome little gadgets to have around.  You can buy a good one and just about any big box store like Target or WalMart or office supply store like Staples or Office Depot.  I would highl...

HOw To HOBBY LOBBY COAT HOOKS

Image
Coat Hooks from Hobby Lobby After blogging about the metal sign letters that I found, I went back to Hobby Lobby last night to get something unrelated to the farm and I found these! They are coat hooks (or whatever you want to hang on them), with the same single letter design as the signs we got the other day. Yes, those are the initials of our first names.  I figured we could mount these either near the front door in the entryway, or near the back door in the mudroom.   That way, we will each have our own hook for our coats, hats, keys or whatever we want to hang on them.

HOw To MUDROOM NEW SHELVES

Image
More Shelving for the Mudroom We got one more set of shelves for the mudroom, a set that's not as 'deep' as the other ones, so that it will fit behind the door and then the door won't hit it every time it's opened.  We put them this direction so that they have a different purpose.  We're going to put our cleaning supplies and other related items on that set of shelves While I was messing around in there putting stuff together and rearranging, I saw a couple of nails in the wall that we missed and I just randomly hung the brooms up there.  We liked the look! So, I am thinking that I'm going to do something like this in that spot... Shaker Style Rail This is called a Shaker Rail.  It was the way the Shaker community (masters of organization and utilitarian design) stored things such as brooms, tools, coats, even their chairs were hung up this way.  As it happens, I have a long board left over from assembling the corner unit that w...

HOw To COOKBOOKS GARDENING BOOKS FARM BOOKS OH MY

Image
Hundreds of Books all in a Row "Hello, we are 1st Man and 2nd Man, and we have a book problem..." Yes, we love books. Cookbooks, gardening books, craft books, how to books, country wisdom books and just about anything we think we could use on the farm...we've been collecting them for years.  We just can't pass up a used book store, or a sale at a regular book store or even something fun on Amazon or eBay..   Prior to this photo, they were in four bookcases in the guest room in the city. When we were deciding what furniture we could move out to the farm, we realized that we could move the bookcases out there and finally have our books all organized where they need to be.  No TV will mean lots of time for reading books, something we can't wait to do. So this weekend's project was to get the bookcases emptied.  Got them all emptied out.  We're leaving one here at the city, and taking the other three to put into the living room at the farm.   Books t...

HOw To NEW SHELVES IN THE CLOSETS

Image
Closet shelves before I promised some pics of the rainy day projects I did last week.  This is one that I'm very happy with how it ultimately came out. On the lower portion, there was already one board on each side of the closet as a support, but no shelf.  I figured that there must have been a shelf over the closet rod once upon a time.  I then found two small strips of wood in the scrap pile, cut them to the same length as the lower ones, painted them white, and screwed them into the wall above the lower ones.  I'll take some white paint and touch up the screw heads.  These closets extend to the full 7 1/2 foot height of the ceilings in the house so I was able to effectively double the space that was already there by putting another set higher up.   I put two shelf boards on each set of supports.  These are 3 foot long boards, 12" deep.  The best part is that since the support boards on the sides were 24" deep, I was able to use two of those...

HOw To OPEN SHELF STORAGE FOR DISHES

Image
Open storage With the distinct lack of larger wall mounted cabinets in our kitchen, we decided to use the open portion of the yellow hutch (baskets above!) as the storage for our dishes. This is a service for 8 that we had in storage to sell at a future garage sale.  This was before we bought the farmhouse.  Anyway, the last time I was at the storage unit, I found the box of them and took them all out to the farm.  They will be perfect for use out there. We've never done this before but I think we like it.  It looks good and neatly organized, it shows you everything you have all at once and it will be easy (once we start hosting dinners at the farm of course) to just grab the dishes we need and walk to the table.   Anyway, do any of you have open storage like this? Off to the farm today, to enjoy some truly relaxing time. More later!  Enjoy your day, whatever you are doing!

HOw To ROLLER SHADES FOR SHELVING

Image
The other day, on Inspiration Thursday , I posted a great vintage picture of a pantry with shelves of beautiful canned fruits and veggies. I noticed (and so did Anywhere Eden  in the comments section), that there were these black roller shades attached to the top of each shelving unit.  I (and Eden) thought this was a pretty amazing, not to mention, simple, idea. Roller shades are available just about anywhere (these of course are black).  It was presumably to keep light from discoloring the canned goods.  Heck, I'm thinking roll down shades could even be a nice way to "tidy up" messy shelves, ha!  Has anyone else seen anything like this? Great idea, I guess it's true, sometimes everything old is new again!

HOw To FUN NEW FINDS

Image
Once again, at lunch I ran over to Marshall's Home Goods and found a couple of great items.  First, this wonderful bright red bucket.  It's a glossy, brilliant fire engine red and the second I saw it I knew it had to be at the farm. It's also really large, hard to tell but it's like twice as big as a regular. Then I saw this set of burlap baskets.  When I first saw them, I thought they were neat but almost didn't give them a second look.  I'm glad I did though... ...because they are printed with these great graphics  showing 20lbs, 10lbs, and 5lbs.  I'm hoping that one day, we can fill them with produce from the fruit trees.

HOw To SEED STORAGE VAULT DIY

Image
Last Summer, I blogged about our DIY seed storage bank or vault idea.  Recently, I realized we needed more space for our seeds, not to mention a way to make them more organized.  So  I took that same idea and multiplied it by four.  It was a rainy weekend and this gave me something to do. We love these cans.  They are  Empty Paint Cans . You can buy them just about anywhere they sell paint or, using link above, via Amazon.  They are very inexpensive, these were $3 each.  So for $12, I was able to get four so that I could divide our growing seed collection.  I came up with  Veggies, Herbs, Salad/Greens , and Flowers. Here is a shot inside showing the seed packets and moisture absorber. Rather than repeat the particulars of how I did this part, you can  CLICK HERE for the original post on it.  It's very simple to do and a great way to organize your seeds and protect them.  I put some labels on them, ...

HOw To FUN NEW FINDS

Image
Once again, at lunch I ran over to Marshall's Home Goods and found a couple of great items.  First, this wonderful bright red bucket.  It's a glossy, brilliant fire engine red and the second I saw it I knew it had to be at the farm. It's also really large, hard to tell but it's like twice as big as a regular. Then I saw this set of burlap baskets.  When I first saw them, I thought they were neat but almost didn't give them a second look.  I'm glad I did though... ...because they are printed with these great graphics  showing 20lbs, 10lbs, and 5lbs.  I'm hoping that one day, we can fill them with produce from the fruit trees.